Saturday, 25 August 2012

Must-Have Resources for Android app Development


If you’re a newcomer to app development, Android needs your apps. You don’t have to pay large sums of money for a college class. All the resources you need are available at your fingertips. Here are a few useful resources to put you on the road to developing Android apps.

The Android Developer Community

With Android in its fourth version, there is a large developer community all over the world. It is now much easier to get solutions to problems, and find like-minded developers to share app ideas and exchange experiences. 

Here are some developer communities/sites that you can turn to for help if you run into problems while working with Android :

Stack Overflow ) — Stack Overflow is a collaboratively edited question and answer site for developers. If you have a question about Android, chances are someone at Stack Overflow is probably already discussing the same question and someone else had already provided the answer. Best of all, other developers can vote for the best answer so that you can know which are the answers that are trustworthy.

- Is another site to add to your favorites as you begin to learn Android development. 
- You’ll have questions about how to do specific things as you go and Stack Overflow can help you with those. Search other questions and answers or post your own.

Lynda.com —This site provides tutorials on a variety of software applications, many centering on software development. Lynda.com offers a section featuring Android app development, with its session, “Android App Development with Essential Java Training” lasting more than seven hours. Access to Lynda.com is not free—subscriptions start at $25 a month—but the courses are taught by top professionals in their area. So you’ll learn Android development from an Android development expert.


Google Android Training  ) — Google has launched the Android Training site that contains a number of useful Classes grouped by topics. At the time of writing, the classes mostly contain useful code  snippets that are very useful to Android developers once they have started with the basics. 
Once you have learned the basics in this book, I strongly suggest you take a look at the classes.
Mobile Tuts+—If you’ve already learned Java for other programming languages and simply need to learn how Java applies to Android Development, Mobile Tuts+ can help. This online written tutorial is available completely free of charge, beginning with the tools you’ll need, a description of Java, and a description of object-oriented programming. Once you’ve gotten that background down, you’ll move on to learning how to work with arrays and the basics of string.

 (Android Discuss) — Android Discuss is a discussion group hosted by Google using the Google Groups service. Here, you Will be able to discuss the various aspects of Android programming. This group is monitored  Closely by the Android team at Google, and so this is a good place to clarify your doubts and  learn new tips and tricks.

TheNewBoston—This free YouTube video series on Android application development is free. For those who learn better through visual demonstration, watching someone walk you through the steps of installing the necessary software and using the various buttons and functions inside that software will likely be much more effective than book learning.

Android Developers Guide—If you’re a more advanced developer, this free resource guide at the Android Developers site includes detailed information about the Android framework. The site also includes how-to videos and forums filled with other Android developers who can help you with any questions you have.

Thanks to the wealth of information available on the web, you no longer have to invest in a college course to learn the basics of Android development. These resources allow you to learn at home, at your own pace, keeping the material to refer back to as you begin developing apps.

Friday, 24 August 2012

Samsung Owes Apple $1.04 billion for Patents


A federal jury in San Jose, Calif., has found Samsung guilty of infringing a number of Apple patents and said that the Korean electronics giant should pay more than $1 billion in damages

Samsung Owes Apple $1.04 billion for Patents


The jury’s verdict in the landmark case found Samsung products infringed on a number of Apple design and utility patents, though not for every phone and tablet that Apple had accused. The seven-man, two-woman jury also said that several Samsung phones diluted the value of the “trade dress,” or protected design, of Apple’s iPhone.

The verdict in the Apple-Samsung legal battle came in much sooner than expected and the news hasn't been good for Samsung. To pull out one of the most relevant details amid all the patents and trade dress claims, the jury has ordered Samsung to pay Apple $1,049,343,540.in damages. Yikes.

Apple was originally seeking an award of $2.45 billion from Samsung, but few thought it would get even remotely that much. However, even $1.05 billion is a very high number for damages. Many of Apple's patent and trade dress claims were found to be valid, and Samsung was ruled to have willfully infringed upon them in multiple cases.
With all of Apple's patents intact, and many Samsung phones apparently at fault, Samsung's legal team just had a really bad start to their weekend.

The verdict will no doubt send shockwaves through the smartphone community and raise question as to whether Apple will now go after other makers of other Android products as well. The company already has lawsuits in progress against HTC.

The jury spent only approximately 21 hours in deliberation before returning its verdict, an extremely fast turnaround for such a complicated case. The verdict form that the jury was required to slog through was more than 20 pages long, and included upwards of 700 very specific questions.


Saturday, 18 August 2012

Professional Android Application Development book reviews

Professional Android 4 Application Development (Wrox Professional Guides) 

Author review 

Developers, build mobile Android apps using Android 4 

The fast-growing popularity of Android Smartphones and tablets creates a huge opportunities for developers. If you're an experienced developer, you can start creating robust mobile Android apps right away with this professional guide to Android 4 application development. Written by one of Google's lead Android developer advocates, this practical book walks you through a series of hands-on projects that illustrate the features of the Android SDK. That includes all the new APIs introduced in Android 3 and 4, including building for tablets, using the Action Bar, Wi-Fi Direct, NFC Beam, and more.
- Shows experienced developers how to create mobile applications for Android smartphones and tablets
- Revised and expanded to cover all the Android SDK releases including Android 4.0 (Ice Cream Sandwich), including all updated APIs, and the latest changes to the Android platform.
- Explains new and enhanced features such as drag and drop, fragments, the action bar, enhanced multitouch support, new environmental sensor support, major improvements to the animation framework, and a range of new communications techniques including NFC and Wi-Fi direct.
- Provides practical guidance on publishing and marketing your applications, best practices for user experience, and more

This book helps you learn to master the design, lifecycle, and UI of an Android app through practical exercises, which you can then use as a basis for developing your own Android apps.
 Professional Android 4 Application Development (Wrox Professional Guides)  Reviews 

Some Customer reviews  


No1: I come from a heavy background in web development, specifically PHP (call it a language or a mess, but it's my web programming language of choice). I've wanted to move into Android development for a while, but never really had an opportunity until recently (3 months ago) to produce something. Naturally, moving to Android development was rough at first for countless reasons, so I've bought books, read tutorials, blogs, watched countless Google I/O videos, and spent hours upon hours browsing the API. For the most part, I've found "here's how to do (insert random task here)." Rarely have tutorials come with the reason something is a best practice or why their way is better than another. Since this is the case for a lot of languages, I mostly accepted it and did my best to make sense of the content out there to build my first app.

A great reference and more:
In the two days that I've had the book, I think I have saved at least 5-6 hours that would have been spent looking for solutions to problems that I felt comfortable implementing in my software. Not only does Reto explain how something is done, but more often then not I feel like I understand why something is done a particular way.. Which, to most developers is crucial to get an understanding of a platform. I would be comfortable saying, there's enough information out there for ANYONE to produce an Android application, but for non-Java programmers there are few resources that really solidify a better understanding of the platform or don't recommend a life-long dedication to Java before picking up the material. I'd feel comfortable recommending the book to anyone with a solid understanding of software development who was looking to get into Android programming.

To be more specific than saying "a solid understanding of software development," I'd say it definitely helps to know some Java syntax, object-oriented programming and MVC practices going in.. Of course, the more the better. Without footing in those a lot of the information (not just in this book, but Android development in general) will be tough to grasp completely. After that, I'd say it's for just about anyone serious about Android Development who has more interest than just getting from A to B. Though it would certainly help anyone just looking to get from A to B.

No2: This is my second book on how to develop apps for Android. It's far more detailed than the other one I bought some months ago, and the extra detail (770 page book) makes it well worth the price. I have a long way to go, but every chapter covers the material in depth so I think this is 'the one'.

My only criticism of the book is that unlike the superlative series of books by Murach, this one has no exercises for you to try and write code as you go. However, code is supplied by the publishers website and it loads into Eclipse for you to play with, and figure it out.

It is updated to Android 4.0 (ICS) so is current at this time.

No3:  This is a decent book if you're an intermediate Android programmer. However, if you are completely new to Android this isn't the book for you.

The author depends too much on the downloaded code and does not give explanations on what is happening most of the time.

Overall, the book is very POWERFULL but I recommend it for advanced user (Not for beginners) , so if you beginners check this book Android for Programmers: Developer Seriesthen you can explore this book .

Level  : advanced .

For more detail Professional Android 4 Application Development (Wrox Professional Guides) Download pdf visit this link   


Android for Programmers: Developer Series book reviews

Android for Programmers: An App-Driven Approach (Deitel Developer Series) 

Author review 

The professional programmer’s Deitel® guide to Android™ smartphone and tablet app development and the Eclipse IDE with the Android Development Tools (ADT) plug-in

Billions of apps have been downloaded from Android Market! This book gives you everything you’ll need to start developing great Android apps quickly and getting them published on Android Market. The book uses an app-driven approach—each new technology is discussed in the context of 16 fully tested Android apps, complete with syntax coloring, code walk-throughs and sample outputs. Apps you’ll develop include:

- SpotOn Game
- Slideshow
- Flag Quiz
- Route Tracker
- Favorite Twitter® Searches
- Address Book
- Tip Calculator
- Doodlz
- Weather Viewer
- Cannon Game
- Voice Recorder
- Pizza Ordering 

Practical, example-rich coverage of:
- Smartphone and Tablet Apps, Android Development Tools (ADT) Plug-In for Eclipse
- Activities, Intents, Content Providers
- GUI Components, Menus, Toasts, Resource Files, Touch and Gesture Processing
- Tablet Apps, ActionBar and AppWidgets
- Tweened Animations, Property Animations
- Camera, Audio, Video, Graphics, OpenGL ES
- Gallery and Media Library Access
- SharedPreferences, Serialization, SQLite
- Handlers and Multithreading, Games
- Google Maps, GPS, Location Services, Sensors
- Internet-Enabled Apps, Web Services, Telephony, Bluetooth®
- Speech Synthesis and Recognition
- Android Market, Pricing, Monetization
Android for Programmers: An App-Driven Approach (Deitel Developer Series) Development Reviews 

Some Customer reviews  

No1: I initially selected this book due to the multiple authors, hoping it would be more error free than other book I have read from single authors. So far that has been true, the more eyes in the review process really help not only catch errors but organize the material. Little things like all code snippets having line numbers and being high-lighted to follow the text really help. There are a good number of screen shots that make it easy to follow along with Eclipse on a windows or mac machine. I read so many posts on the internet saying Android has no GUI builder to layout widgets, and was very surprised, it wasn't until this book, I found out they are wrong. Adroid being what it is with Google behind it needs all the help with documentation and organization it can get. Google has that tendency to just leave it as-is, while their phD's make more hard to follow videos. The 16 apps they use as examples cover a nice range of UI, Services and libraries. The only negative is I'd prefer to not use Eclipse and would rather use my editor and a make file, but this isn't the authors faults, Android seems to be married to the ADT visual layout editor plugin and the ant build system. This book is for the rest of us that are normal C++ or C# or Java folks and can talk layman terms in getting the job done. The authors are to be commended for that alone! 

No2: This book is well written and logically structured. It is not a book about Java programming, so you might want to look at other books if that is what you need. I found the app driven approach easier (and more interesting) than the standard online tutorials. The book also contains numerous links to helpful Android web sites. This is particularly useful for those who want to dig deeper into any topic.

No3:  I'm working my way through Android for Programmers (an App-Driven Approach) and it is by far the best (of the three I've purchased!) on Android development.The book presents the app/code and then goes through it allowing you to cut and paste more mundane tasks(variable declarations and GUI formatting) once you've mastered them and allows you to focus on the JAVA and techniques.
I don't have a ton of Java experience, but I found this extremely easy to pick up (if you know Ruby, C++, C# or other Object Oriented Languages, you can easily follow the Java).
One negative: The online chapters aren't done as of 3/17/2012; hopefully soon.

Overall, the book is very easy to follow with great examples but I recommend you to read this book first Beginning Android 4 Application Development Reviews  then this book .

Level  : intermediate level so you must read the previous book before to begin this book . 

For more detail Android for Programmers: An App-Driven Approach (Deitel Developer Series) Download pdf visit this link   


Beginning Android 4 Application Development book reviews

Beginning Android 4 Application Development Reviews 

In the last tutorial we know ho to Running Android virtual device and now its the time to explore some useful android book . 

Author review 

Understanding Android OS for both Smartphone and tablet programming 
This fast-paced introduction to the newest release of Android OS gives aspiring mobile app developers what they need to know to program for today's hottest Android Smartphones and tablets. Android 4 OS is, for the first time, a single solution for both Smartphones and tablets, so if you master the information in this helpful guide, you'll be well on your way to successful development for both devices. From using activities and intents and creating rich user interfaces to working with SMS, messaging APIs, and the Android SDK, what you need is here.

-  Provides clear instructions backed by real-world programming examples
- Begins with the basics and covers everything Android 4 developers need to know for both Smartphones and tablets
- Explains how to customize activities and intents, create rich user interfaces, and manage data
- Helps you work with SMS and messaging APIs, the Android SDK, and using location-based services
- Details how to package and publish your applications to the Android Market
- Beginning Android 4 Application Development pares down the most essential steps you need to know so you can start creating Android applications today.
Beginning Android 4 Application Development Reviews 

Some Customer reviews  

No1: I picked this book up after completing my intro to computer science class where we learned Java, and thought it'd be good to learn to program for Android. I've been working on a small app of mine, and it's great to go through the book and add new features. Awesome book for reference as well.
I've found this book very easy to read through on the Kindle version when viewed on the PC, however I would not suggest copying and pasting the code. You won't learn it as well, and the formatting will be a nightmare.
I recommend this book to anyone with prior knowledge of Java looking to get into Android.

No2: I have developed software for 18 years but I am new to Android. I think this book is a great tool for someone that is already a developer and wants to jump into the Android platform. The book contains a wide variety of very practical examples with very good explanations. I can tell this author really thought through the content of the book. The result has been a fine compendium of the most important facets of Android development.

No3: I just bought this book last week and start reading from chapter 1, 2, 3 and learned that this book is really easy to learn. I like the author's style that he provided the code first and explained how the code does step by step later. It is easy to follow. This book describes what the title says: Beginning Android 4. I am new to Android, but I am an experience java web developer, that helps me to focus android coding from this book and learn Android 4 very quickly. I love how the book layout with multi-color which makes the reader easy and enjoy reading.
If you a beginner, this book is for you. I will update more after finishing the book. 

My own review about Beginning Android 4 Application Development Reviews is:
 I recommend this book to anyone who has knowledge of Java and looking to get into Android and you can download sample chapters 

Running Android virtual device - App Development Tutorial

Running Your App on Android virtual device

If you followed the previous tutorial Building your own Android App to create an Android project, you have created your first Hello World Android application source files that allow you to immediately run the app on the Android virtual device.

How you run your app depends on two things:

 Whether you have a real Android-powered device and whether you’re using Eclipse. This tutorial shows you how to install and run your app on a real device and on the Android emulator (Android virtual device), and in both cases with either Eclipse or the command line tools.
Before you run your app, note the various files that make up an Android project in the Package Explorer in Eclipse. 

Android project architecture 

android project architecture

The various folders and their files are as follows:

AndroidManifest.xml
The manifest file describes the fundamental characteristics of the app and defines each of its components.
For example all Activities and Services of the application must be declared in this file. It must also contain the required permissions for the application. For example if the application requires network access it must be specified.

src/
Directory for your app's main source files. By default, it includes an Activity class that runs when your app is launched using the app icon.

res/
Contains several sub-directories for app resources. res directory contains structured values which are known to the Android platform, the assets directory can be used to store any kind of data. You access this data via the AssetsManager which you can access the getAssets() method. AssetsManager allows to read an assets as InputStream with the open() method. 

drawable-hdpi/
Directory for drawable objects (such as bitmaps) that are designed for high-density (hdpi) screens. Other drawable directories contain assets designed for other screen densities.

layout/
Directory for files that define your app's user interface.

values/
Directory for other various XML files that contain a collection of resources, such as string and color definitions.
When you build and run the default Android app, the default Activity class starts and loads a layout file that says "Hello World." The result is nothing exciting, but it's important that you understand how to run your app before you start developing.

Run on the Android virtual device (Emulator)

You are now ready to test your application on the Android emulator. Right-click the project name in Eclipse and select Run As  ->  Android Application .

Run on the Android virtual device (Emulator)

Run on the Android virtual device (Emulator)

If you have not made any mistakes in the project, you should now be able to see the application installed and running on the Android virtual device (emulator).
Run on the Android virtual device (Emulator)


Run on a Real Android Device

If you have a real Android-powered device, here's how you can install and run your app . Visit this link from Google to know how to   Run on a Real Android Device
http://developer.android.com/training/basics/firstapp/running-app.html

Now you can explore some resources and book for increase your knowledge , you can begin with beginner book : Beginning Android 4 Application Development book reviews

Create an Android Project & import samples with Eclipse

Building your own Android App

Welcome to Android Development Tutorial!

This Tutorial teaches you how to build your own (first) Android app. You’ll learn how to create an Android project and how to import the Android app’s project into Eclipse.
Before you start this Tutorial, be sure you have your android development environment set up.

 You need to:

- Download the Android SDK.
- Install the ADT plugin for Eclipse (if you’ll use the Eclipse IDE (.
- Download the latest SDK tools and platforms using the SDK Manager.
We discuss these steps in previous tutorial Android SDK tools and Installing Android ADT Plugin For Eclipse, once you've finished the setup; you're ready to begin this tutorial.
This tutorial teaches you some fundamental concepts about Android development, so it's important that you follow each step.

Creating Your First Android Application


You’ve downloaded the SDK, installed Eclipse, and plugged in the plug-in. You are now ready to start programming for Android. Start by creating a new Android project and setting up your Eclipse run and debug configurations, as described in the following steps.

Creating a New Android Project

To create a new Android project using the Android New Project Wizard, do the following:
- Select File -> New -> Project.
- Select the Android Project application type from the Android folder, and click next.
- In the wizard that appears, enter the details for your new project. On the first page, the Project Name is the name of your project file. You can also select the location your project should be saved.
The next step lets you select the build target for your application. The build target is the version of the Android framework SDK that you plan to develop with. In addition to the open sourced Android SDK libraries available as part of each platform release, Google offers a set of proprietary APIs that offer additional libraries (such as Maps). If you want to use these Google-specific APIs, you must select the Google APIs package corresponding to the platform release you want to target.
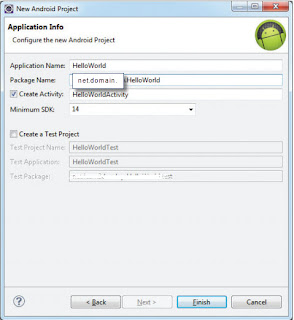
The final step allows you to specify the application properties. The Application Name is the friendly name for your application; the Package Name specifies its Java package; the Create Activity option lets you specify the name of a class that will be your initial Activity; and setting the Minimum SDK lets you specify the minimum version of the SDK that your application will run on.

Creating a New Android Project

Creating a New Android Project

Creating a New Android Project

Creating a New Android Project


More details about android PROPERTIES

Project Name: Provide any name of your choice here; I named it ‘Hello World’.
Build Target: This field asks you which version of Android do you want your App to target on. Check any one of your choice. Along with Target Name you can see the API Level (marked in the box) which is numbers representing the level of the Android API. This would be used to specify Min SDK Version field, which we’ll know in few seconds.
Application Name: This is a name which you’d want to give to your final Application. This would be displayed in the phone’s menu and also on title bar of App. You may provide any name of your choice. It's not a mandatory field.
Package Name: This gives a package structure to your App. If you are familiar to java you probably already related it to java package, which is absolutely correct. You may name it anything like ‘android.firstApp’ or ‘com.apps.android.firstApp’. The dots in the package name just provide a hierarchical structure to app.  The package name must have at least two identifiers (dot separated). It's a required field.
Create Activity: We discuss Activities in this tutorial Android Application User Interface tutoril  , but for now I'd like you to know that every App’s function is treated as an activity in android, and you can give a name to your activity. You can have activities and sub-activities in your apps. Again, this is not a mandatory field. Note: It won't allow spaces in this field.
Min SDK Version: Do you remember, we came across this name while talking about ‘Build Target’. This field tells your app to put an extra check on the application that it is only focused on some minimum level of Build Target. This field takes in numeric value corresponding to the API Level of Build target. It would specify that if any target environment is below this Min SDK Version, then this application won't work. This ideally should be equal to the API Level value of the Build Target selected above by you. But this is not a Mandatory field, and so even if you give any other version, it would accept it with a warning message.

The Summary of android PROPERTIES

Project name: The name of the project
Application name: A user-friendly name for your application
Package name: The name of the package. You should use a reverse domain name for this.
Create Activity: The name of the first activity in your application
Min SDK Version: The minimum version of the SDK that your project is targeting

Import the app’s Android project into Eclipse

-  Opening  the Import  Dialog then  Select  File ->  Import…  to  open  the  Import  dialog
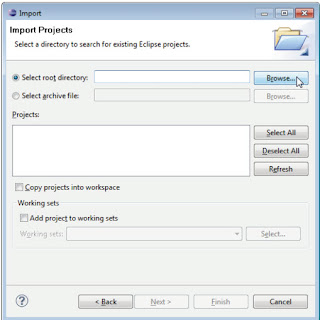
- Importing your app’s project (sample code).  In the Import dialog, expand the General node and select Existing Projects into Workspace, then click Next -> to proceed to the Import Projects step. Ensure that Select root directory is selected, and then click the Browse button. In the Browse for Folder dialog, locate the sample folder, select it and click OK. Click Finish to import the project into Eclipse. The project now appears in the Package Explorer window at the left side of the Eclipse window.
Import the app’s Android project into Eclipse

Import the app’s Android project into Eclipse


Thursday, 16 August 2012

Voice Search arrives in 13 new languages

“Norwegian restaurants in New York City.” I can type that phrase fast, but I can say it even faster—and when I’m on the go, speed is what I’m looking for. With Voice Search, you can speak into your phone to get search results quickly and easily. Voice Search is already available in 29 languages, and today, we're bringing support to 13 new languages for Android users—bringing the total to 42 languages and accents in 46 countries. In fact, 100 million new speakers can use Voice Search now, with the addition of:
  • Basque
  • Bulgarian
  • Catalan
  • European Portuguese
  • Finnish
  • Galician
  • Hungarian
  • Icelandic
  • Norwegian
  • Romanian
  • Serbian
  • Slovak
  • Swedish

Each new language usually requires that we initially collect hundreds of thousands of utterances from volunteers and, although we’ve been working on speech recognition for several years, adding these new languages led our engineers and scientists to tackle some unique challenges. While languages like Romanian follow predictable pronunciation rules, others, like Swedish, required that we recruit native speakers to provide us with the pronunciations for thousands of words. Our scientists then built a machine learning system based on that data to predict how all other Swedish words would be pronounced.

This update has already started to roll out, and will continue to do so over the course of the next week. How you get started with Google Voice Search depends on what kind of phone you have. If your phone runs Android 2.2 or later, and you see the microphone icon on the Google Search widget on your homescreen, all you have to do is tap the icon to start a voice-powered search. Otherwise, you can install the Voice Search app from Google Play. Note that you can only speak one language into the app at a time, and you may need to change your language settings to use one of these new languages.

As with other languages we’ve added, one of the major benefits to Google’s cloud-based model is that the more people use Voice Search, the more accurate it becomes.

Posted by Bertrand Damiba, Product Manager

Creating Your Own Spelling Checker Service

Posted by Satoshi Kataoka and Ken Wakasa of the Android text input engineering team


The Spelling Checker framework improves the text-input experience on Android by helping the user quickly identify and correct spelling errors. When an app uses the spelling checker framework, the user can see a red underline beneath misspelled or unrecognized words so that the user can correct mistakes instantly by choosing a suggestion from a dropdown list.


If you are an input method editor (IME) developer, the Spelling Checker framework gives you a great way to provide an even better experience for your users. You can add your own spelling checker service to your IME to provide consistent spelling error corrections from your own custom dictionary. Your spelling checker can recognize and suggest corrections for the vocabularies that are most important to your users, and if your language is not supported by the built-in spelling checker, you can provide a spelling checker for that language.


The Spelling Checker APIs let you create your own spelling checker service with minimal steps. The framework manages the interaction between your spelling checker service and a text input field. In this post we’ll give you an overview of how to implement a spelling checker service. For details, take a look at the Spelling Checker Framework API Guide.


1. Create a spelling checker service class


To create a spelling checker service, the first step is to create a spelling checker service class that extends android.service.textservice.SpellCheckerService.


For a working example of a spelling checker, you may want to take a look at the SampleSpellCheckerService class in the SpellChecker sample app, available from the Samples download package in the Android SDK.


2. Implement the required methods


Next, in your subclass of SpellCheckerService, implement the methods createSession() and onGetSuggestions(), as shown in the following code snippet:

@Override                                                                        
public Session createSession() {
return new AndroidSpellCheckerSession();
}

private static class AndroidSpellCheckerSession extends Session {
@Override
public SuggestionsInfo onGetSuggestions(TextInfo textInfo, int suggestionsLimit) {
SuggestionsInfo suggestionsInfo;
... // look up suggestions for TextInfo
return suggestionsInfo;
}
}


Note that the input argument textInfo of onGetSuggestions(TextInfo, int) contains a single word. The method returns suggestions for that word as a SuggestionsInfo object. The implementation of this method can access your custom dictionary and any utility classes for extracting and ranking suggestions.


For sentence-level checking, you can also implement onGetSuggestionsMultiple(), which accepts an array of TextInfo.


3. Register the spelling checker service in AndroidManifest.xml


In addition to implementing your subclass, you need to declare the spelling checker service in your manifest file. The declaration specifies the application, the service, and a metadata file that defines the Activity to use for controlling settings. Here’s an example:

<manifest xmlns:android="http://schemas.android.com/apk/res/android"
package="com.example.android.samplespellcheckerservice">
<application android:label="@string/app_name">
<service
android:label="@string/app_name"
android:name=".SampleSpellCheckerService"
android:permission="android.permission.BIND_TEXT_SERVICE">
<intent-filter>
<action
android:name="android.service.textservice.SpellCheckerService" />
</intent-filter>
<meta-data
android:name="android.view.textservice.scs"
android:resource="@xml/spellchecker" />
</service>
</application>
</manifest>


Notice that the service must request the permission android.permission.BIND_TEXT_SERVICE to ensure that only the system binds to the service.


4. Create a metadata XML resource file


Last, create a metadata file for your spelling checker to define the Activity to use for controlling spelling checker settings. The metadata file can also define subtypes for the spelling checker. Place the file in the location specified in the

element of the spelling checker declaration in the manifest file.


In the example below, the metadata file spellchecker.xml specifies the settings Activity as SpellCheckerSettingsActivity and includes subtypes to define the locales that the spelling checker can handle.

<spell-checker xmlns:android="http://schemas.android.com/apk/res/android"
android:label="@string/spellchecker_name"
android:settingsactivity="com.example.SpellCheckerSettingsActivity" />
<subtype
android:label="@string/subtype_generic"
android:subtypeLocale="en" />
</spell-checker>


That’s it! Your spelling checker service is now available to client applications such as your IME.


Bonus points: Add batch processing of multiple sentences


For faster, more accurate spell-checking, Android 4.1 (Jelly Bean) introduces APIs that let clients pass multiple sentences to your spelling checker at once.


To support sentence-level checking for multiple sentences in a single call, just override and implement the method onGetSentenceSuggestionsMultiple(), as shown below.

private static class AndroidSpellCheckerSession extends Session {                 
@Override
public SentenceSuggestionsInfo[] onGetSentenceSuggestionsMultiple(
TextInfo[] textInfo, int suggestionsLimit) {
SentenceSuggestionsInfo[] sentenceSuggestionsInfos;
... // look up suggestions for each TextInfo
return sentenceSuggestionsInfos
}
}


In this case, textInfo is an array of TextInfo, each of which holds a sentence. The method returns lengths and offsets of suggestions for each sentence as a SentenceSuggestionsInfo object.


Documents and samples


If you’d like to learn more about how to use the spelling checker APIs, take a look at these documents and samples:

  • Spelling Checker Framework API Guide — a developer guide covering the Spelling Checker API for clients and services.

  • SampleSpellCheckerService sample app — helps you get started with your spelling checker service.

    • You can find the app at /samples/android-15/SpellChecker/SampleSpellCheckerService in the Samples download.


  • HelloSpellChecker sample app — a basic app that uses a spelling checker.

    • You can find the app at /samples/android-15/SpellChecker/HelloSpellChecker in the Samples download.


To learn how to download sample apps for the Android SDK, see Samples.


Join the discussion on

+Android Developers


Download And Installing Android ADT Plugin For Eclipse


Download And Installing Android ADT Plugin For Eclipse

Previous tutorial  Android SDK tools show you how to install android SDK tools and the Eclips IDE . Now I'm going to complete the steps. First I will show you how to download and install Android ADT Plugin For Eclipse, then how to update the Android ADT Plugin For Eclipse , and finally how to create avd .

Installing the ADT Plugin for Eclipse

Android Development Tools (ADT)

When Eclipse is launched, select Help ->  Install New Software  to install the Android Development Tools (ADT) plug-in for Eclipse.
Installing the ADT Plugin for Eclipse
ADT Plugin for Eclipse   

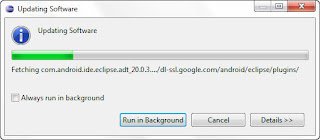
In the Install dialog that appears, specify https://dl-ssl.google.com/android/eclipse/ and press Enter. After a while, you will see the Developer Tools' item appear in the middle of the window . Expand it to reveal its content: Android DDMS, Android Development Tools, Android Hierarchy Viewer, and Android Traceview. 
Check all of them and click Next twice.

Installing the ADT Plugin
You will be asked to review and accept the  licenses. Check the “I accept the terms of the  license agreements” option and click Finish. Once the installation is completed, you will be asked to  restart Eclipse. Go ahead and restart Eclipse now. 

Installing the ADT Plugin
When Eclipse is restarted, you are asked to configure your Android SDK. As the  Android SDK has already been downloaded earlier In the previous tutorial Android SDK tools , check the “Use existing  SDKs” option and specify the directory where you  have installed the Android SDK. Click Next. 
After this step, you are asked to send your usage statistics to Google. Once you have selected your  choice, click Finish.

For more details about installing the ADT Plugin, go to
And carefully follow developer.android.com/sdk/eclipse-adt.html
the instructions for downloading and installing the ADT Plugin. 
If you have any problems downloading the ADT, check out Google’s help at

Updating the ADT Plugin for Eclipse

In most cases, you can update your ADT plug-in simply as follows:
1.   Navigate to Help -> Check for Updates.
2.   If there are any ADT updates available, they will be presented. Simply select them and choose Install.
Sometimes a plug-in upgrade may be so significant that the dynamic update mechanism can’t be used. In those cases you may have to remove the previous plug-in  completely before installing the newer version.
Updating the ADT Plugin for Eclipse
Updating the ADT Plugin for Eclipse  

Updating the ADT Plugin for Eclipse
Updating the ADT Plugin for Eclipse  

Updating the ADT Plugin for Eclipse
Updating the ADT Plugin for Eclipse  

Updating the ADT Plugin for Eclipse
Updating the ADT Plugin for Eclipse  

Updating the ADT Plugin for Eclipse
Updating the ADT Plugin for Eclipse  

Updating the ADT Plugin for Eclipse
Updating the ADT Plugin for Eclipse  
      

Creating Android Virtual Devices (AVDs) for Use in the Android Emulator


Creating Android Virtual Devices (AVDs)

The Android emulator, included in the Android SDK, allows you to run Android apps in a simulated environment on your computer rather than on an actual Android device. Before running an app in the emulator, you must create an Android Virtual Device (AVD) which defines the characteristics of the device on which you want to test, including the screen size in pixels, the pixel density, the physical size of the screen, size of the SD card for data storage and more. If you want to test your apps for multiple Android devices, you can create separate AVDs that emulate each unique device. To do so, perform the following steps:
To create an AVD, From Eclipse select Window ->  AVD Manager to display the Android Virtual Device Manager window .

Creating Android Virtual Devices (AVDs)
Creating Android Virtual Devices (AVDs)  
 Click New… to display the Create new Android Virtual Device (AVD) window, then configure the optionsas shown and click Create AVD. 

Create new Android Virtual Device
Each AVD you create has many other options specified in its config.ini. You can modify this file as described at 
developer.android.com/guide/developing/devices/managing-avds.html
To more precisely match the hardware configuration of your device.
It is preferable to create a few AVDs with different API levels and hardware configurations so that your application can be tested on different versions of the Android OS. 
Once your ADV has been created, it is time to test it. Select the AVD that you want to test and click the Start… button. The Launch Options dialog will appear. If you have a small monitor, it is recommended that you check the “Scale display to real size” option so that you can set the emulator to a smaller size. Click the Launch button to start the emulator.

AVDs with different API levels
AVDs with different API levels 
Now all tools are ready and you will be able to learn how to write your first Android application!

Download & Installing Android SDK tools - Eclipse Tutorial


Android SDK tools and Eclipse Tutorial

In the previous tutorial we know To develop Android apps you need a Windows®, Linux or Mac OS X system  Android Developer Tools . Now I'm going to download and install Android SDK tools & eclipse tools that required for developing the first app with android.

Installing the Java Development Kit (JDK)

Android requires the Java Development Kit (JDK) version 5 or 6 (JDK 5 or JDK 6). We used JDK 6. To download the JDK for Linux or Windows, go to
You need only the JDK. Be sure to follow the installation instructions at
Recent versions of Mac OS X come with Java SE 6. Be sure to get the latest version by using the Apple menu feature to check for software updates.

Android SDK

Download android sdk

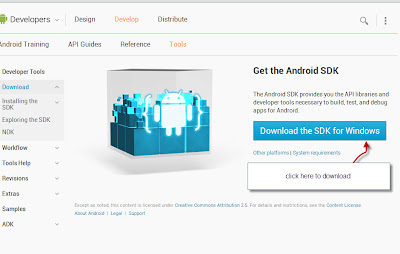
You can download the Android SDK tools from developer.android.com/sdk/index.html
Click the link for your platform. Windows, Mac OS X or Linux to download the SDK’s archive file. Once you’ve downloaded the archive, simply extract its contents to a directory of your choice on your computer. Google recommends that you download the  installer_r20.0.3-windows.exe http://dl.google.com/android/installer_r20.0.3-windows.exe file instead and use it to set up the tools for you automatically. The following steps walk you through the installation process using this approach.
Download android sdk
Download Android SDK

Installing the Android SDK Tools

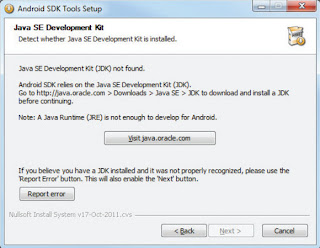
When you have downloaded the installer_r20.0.3-windows.exe file, double-click it to start the installation of the Android tools. In the welcome screen of the Setup Wizard, click Next to continue If your computer does not have Java installed, you will see the error dialog shown in the picture .
Installing the Android SDK Tools

  
Note : to avoid this error you must Installing the Java Development Kit (JDK) .
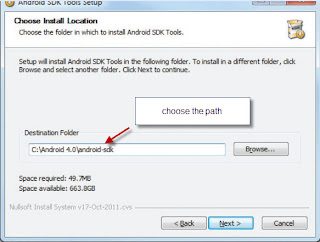
You will be asked to provide a destination folder to install the Android SDK tools. Enter a destination path  and click Next.

Installing the Android SDK Tools
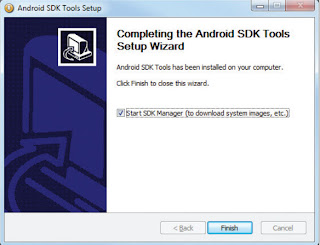
When the setup is done, check the “Start SDK Manager (to download system images, etc.)” option and click Finish. This will start the SDK Manager.
Note : to avoid any problem though installation runs the SDK Manger as administrator .

Installing the Android SDK Tools

Configuring the Android SDK Manager


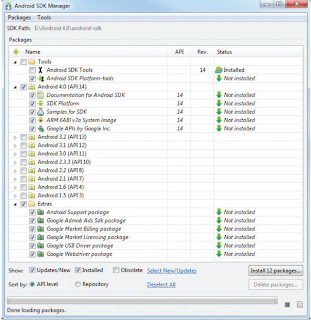
The Android SDK Manager manages the various versions of the Android SDK currently installed on your computer. When it is launched, you will see a list of items and whether or not they are currently installed on your computer. 
Android SDK Manager
Android SDK Manager

Check the relevant tools, documentation, and platforms you need for your project. Once you have selected the items you want, click the Install button to download them. Because it takes a while to download from Google’s server, it is a good idea to download only what you need immediately, and download the rest when you have more time.

NOTE  For a start, you should at least select the latest Android 4.0 SDK platform and the Extras. 

Each version of the Android OS is identified by an API level number. For example, Android 2.3.3 is level 10 (API 10), while Android 3.0 is level 11 (API 11), and so on. For each level, two platforms are available. For example, level 14 offers the following:
- SDK Platform
- Google APIs by Google Inc.

The key difference between the two is that the Google APIs platform contains additional APIs provided by Google (such as the Google Maps library). Therefore, if the application you are writing requires Google Maps, you need to create an AVD using the Google APIs platform .

You will be asked to choose the packages to install. Check the Accept All options and click Install.


Configuring the Android SDK Manager
The SDK Manager will proceed to download the packages that you have selected. The installation takes some time, so be patient. When all the packages are installed, you will be asked to restart the ADB (Android Debug Bridge). Click Yes.

Installing the Eclipse IDE 


Eclipse is the recommended integrated development environment (IDE) for Android development, though it’s possible to use other IDEs, text editors and command-line tools. To download the Eclipse IDE for Java Developers, go to www.eclipse.org/downloads/ .
This page will allow you to download the latest version of Eclipse and you will see the latest version. To use another version, click the Older Versions' link above the list of downloads. Select the appropriate version for your operating system (Windows, Mac or Linux). To install Eclipse, you simply extract the archive’s contents to your hard drive. 
On our Windows 7 system, we extracted the contents to C:\Eclipse. 

For more Eclipse installation information, see http://wiki.eclipse.org/FAQ_Where_do_I_get_and_install_Eclipse%3F
Note: when you download the example code from some site you need to configure Eclipse to use JDKX (x like 6 or 7) by performing the following steps:

1. Locate the Eclipse folder on your system and double click the Eclipse icon (eclipse.exe) to open Eclipse.
2. When the Workspace Launcher window appears, click OK.
3. Select Window > Preferences to display the Preferences window.
4. Expand the Java node and select the Compiler node. Under JDK Compliance, set Compiler compliance level to x.x(x.x like 1.6 or 1.7 etc ).
5. Close Eclipse.

 Continue to part 2 of tools that required for developing the first app with android .
Installing Android ADT Plugin For Eclipse