Showing posts with label Android Tools. Show all posts

Saturday, 25 August 2012

Must-Have Resources for Android app Development


If you’re a newcomer to app development, Android needs your apps. You don’t have to pay large sums of money for a college class. All the resources you need are available at your fingertips. Here are a few useful resources to put you on the road to developing Android apps.

The Android Developer Community

With Android in its fourth version, there is a large developer community all over the world. It is now much easier to get solutions to problems, and find like-minded developers to share app ideas and exchange experiences. 

Here are some developer communities/sites that you can turn to for help if you run into problems while working with Android :

Stack Overflow ) — Stack Overflow is a collaboratively edited question and answer site for developers. If you have a question about Android, chances are someone at Stack Overflow is probably already discussing the same question and someone else had already provided the answer. Best of all, other developers can vote for the best answer so that you can know which are the answers that are trustworthy.

- Is another site to add to your favorites as you begin to learn Android development. 
- You’ll have questions about how to do specific things as you go and Stack Overflow can help you with those. Search other questions and answers or post your own.

Lynda.com —This site provides tutorials on a variety of software applications, many centering on software development. Lynda.com offers a section featuring Android app development, with its session, “Android App Development with Essential Java Training” lasting more than seven hours. Access to Lynda.com is not free—subscriptions start at $25 a month—but the courses are taught by top professionals in their area. So you’ll learn Android development from an Android development expert.


Google Android Training  ) — Google has launched the Android Training site that contains a number of useful Classes grouped by topics. At the time of writing, the classes mostly contain useful code  snippets that are very useful to Android developers once they have started with the basics. 
Once you have learned the basics in this book, I strongly suggest you take a look at the classes.
Mobile Tuts+—If you’ve already learned Java for other programming languages and simply need to learn how Java applies to Android Development, Mobile Tuts+ can help. This online written tutorial is available completely free of charge, beginning with the tools you’ll need, a description of Java, and a description of object-oriented programming. Once you’ve gotten that background down, you’ll move on to learning how to work with arrays and the basics of string.

 (Android Discuss) — Android Discuss is a discussion group hosted by Google using the Google Groups service. Here, you Will be able to discuss the various aspects of Android programming. This group is monitored  Closely by the Android team at Google, and so this is a good place to clarify your doubts and  learn new tips and tricks.

TheNewBoston—This free YouTube video series on Android application development is free. For those who learn better through visual demonstration, watching someone walk you through the steps of installing the necessary software and using the various buttons and functions inside that software will likely be much more effective than book learning.

Android Developers Guide—If you’re a more advanced developer, this free resource guide at the Android Developers site includes detailed information about the Android framework. The site also includes how-to videos and forums filled with other Android developers who can help you with any questions you have.

Thanks to the wealth of information available on the web, you no longer have to invest in a college course to learn the basics of Android development. These resources allow you to learn at home, at your own pace, keeping the material to refer back to as you begin developing apps.

Saturday, 18 August 2012

Running Android virtual device - App Development Tutorial

Running Your App on Android virtual device

If you followed the previous tutorial Building your own Android App to create an Android project, you have created your first Hello World Android application source files that allow you to immediately run the app on the Android virtual device.

How you run your app depends on two things:

 Whether you have a real Android-powered device and whether you’re using Eclipse. This tutorial shows you how to install and run your app on a real device and on the Android emulator (Android virtual device), and in both cases with either Eclipse or the command line tools.
Before you run your app, note the various files that make up an Android project in the Package Explorer in Eclipse. 

Android project architecture 

android project architecture

The various folders and their files are as follows:

AndroidManifest.xml
The manifest file describes the fundamental characteristics of the app and defines each of its components.
For example all Activities and Services of the application must be declared in this file. It must also contain the required permissions for the application. For example if the application requires network access it must be specified.

src/
Directory for your app's main source files. By default, it includes an Activity class that runs when your app is launched using the app icon.

res/
Contains several sub-directories for app resources. res directory contains structured values which are known to the Android platform, the assets directory can be used to store any kind of data. You access this data via the AssetsManager which you can access the getAssets() method. AssetsManager allows to read an assets as InputStream with the open() method. 

drawable-hdpi/
Directory for drawable objects (such as bitmaps) that are designed for high-density (hdpi) screens. Other drawable directories contain assets designed for other screen densities.

layout/
Directory for files that define your app's user interface.

values/
Directory for other various XML files that contain a collection of resources, such as string and color definitions.
When you build and run the default Android app, the default Activity class starts and loads a layout file that says "Hello World." The result is nothing exciting, but it's important that you understand how to run your app before you start developing.

Run on the Android virtual device (Emulator)

You are now ready to test your application on the Android emulator. Right-click the project name in Eclipse and select Run As  ->  Android Application .

Run on the Android virtual device (Emulator)

Run on the Android virtual device (Emulator)

If you have not made any mistakes in the project, you should now be able to see the application installed and running on the Android virtual device (emulator).
Run on the Android virtual device (Emulator)


Run on a Real Android Device

If you have a real Android-powered device, here's how you can install and run your app . Visit this link from Google to know how to   Run on a Real Android Device
http://developer.android.com/training/basics/firstapp/running-app.html

Now you can explore some resources and book for increase your knowledge , you can begin with beginner book : Beginning Android 4 Application Development book reviews

Create an Android Project & import samples with Eclipse

Building your own Android App

Welcome to Android Development Tutorial!

This Tutorial teaches you how to build your own (first) Android app. You’ll learn how to create an Android project and how to import the Android app’s project into Eclipse.
Before you start this Tutorial, be sure you have your android development environment set up.

 You need to:

- Download the Android SDK.
- Install the ADT plugin for Eclipse (if you’ll use the Eclipse IDE (.
- Download the latest SDK tools and platforms using the SDK Manager.
We discuss these steps in previous tutorial Android SDK tools and Installing Android ADT Plugin For Eclipse, once you've finished the setup; you're ready to begin this tutorial.
This tutorial teaches you some fundamental concepts about Android development, so it's important that you follow each step.

Creating Your First Android Application


You’ve downloaded the SDK, installed Eclipse, and plugged in the plug-in. You are now ready to start programming for Android. Start by creating a new Android project and setting up your Eclipse run and debug configurations, as described in the following steps.

Creating a New Android Project

To create a new Android project using the Android New Project Wizard, do the following:
- Select File -> New -> Project.
- Select the Android Project application type from the Android folder, and click next.
- In the wizard that appears, enter the details for your new project. On the first page, the Project Name is the name of your project file. You can also select the location your project should be saved.
The next step lets you select the build target for your application. The build target is the version of the Android framework SDK that you plan to develop with. In addition to the open sourced Android SDK libraries available as part of each platform release, Google offers a set of proprietary APIs that offer additional libraries (such as Maps). If you want to use these Google-specific APIs, you must select the Google APIs package corresponding to the platform release you want to target.
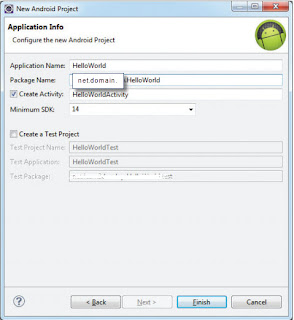
The final step allows you to specify the application properties. The Application Name is the friendly name for your application; the Package Name specifies its Java package; the Create Activity option lets you specify the name of a class that will be your initial Activity; and setting the Minimum SDK lets you specify the minimum version of the SDK that your application will run on.

Creating a New Android Project

Creating a New Android Project

Creating a New Android Project

Creating a New Android Project


More details about android PROPERTIES

Project Name: Provide any name of your choice here; I named it ‘Hello World’.
Build Target: This field asks you which version of Android do you want your App to target on. Check any one of your choice. Along with Target Name you can see the API Level (marked in the box) which is numbers representing the level of the Android API. This would be used to specify Min SDK Version field, which we’ll know in few seconds.
Application Name: This is a name which you’d want to give to your final Application. This would be displayed in the phone’s menu and also on title bar of App. You may provide any name of your choice. It's not a mandatory field.
Package Name: This gives a package structure to your App. If you are familiar to java you probably already related it to java package, which is absolutely correct. You may name it anything like ‘android.firstApp’ or ‘com.apps.android.firstApp’. The dots in the package name just provide a hierarchical structure to app.  The package name must have at least two identifiers (dot separated). It's a required field.
Create Activity: We discuss Activities in this tutorial Android Application User Interface tutoril  , but for now I'd like you to know that every App’s function is treated as an activity in android, and you can give a name to your activity. You can have activities and sub-activities in your apps. Again, this is not a mandatory field. Note: It won't allow spaces in this field.
Min SDK Version: Do you remember, we came across this name while talking about ‘Build Target’. This field tells your app to put an extra check on the application that it is only focused on some minimum level of Build Target. This field takes in numeric value corresponding to the API Level of Build target. It would specify that if any target environment is below this Min SDK Version, then this application won't work. This ideally should be equal to the API Level value of the Build Target selected above by you. But this is not a Mandatory field, and so even if you give any other version, it would accept it with a warning message.

The Summary of android PROPERTIES

Project name: The name of the project
Application name: A user-friendly name for your application
Package name: The name of the package. You should use a reverse domain name for this.
Create Activity: The name of the first activity in your application
Min SDK Version: The minimum version of the SDK that your project is targeting

Import the app’s Android project into Eclipse

-  Opening  the Import  Dialog then  Select  File ->  Import…  to  open  the  Import  dialog
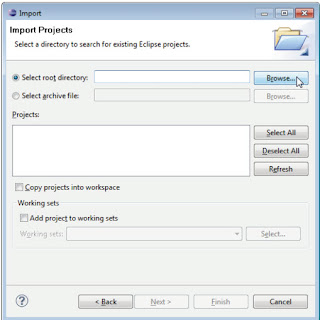
- Importing your app’s project (sample code).  In the Import dialog, expand the General node and select Existing Projects into Workspace, then click Next -> to proceed to the Import Projects step. Ensure that Select root directory is selected, and then click the Browse button. In the Browse for Folder dialog, locate the sample folder, select it and click OK. Click Finish to import the project into Eclipse. The project now appears in the Package Explorer window at the left side of the Eclipse window.
Import the app’s Android project into Eclipse

Import the app’s Android project into Eclipse


Thursday, 16 August 2012

Download And Installing Android ADT Plugin For Eclipse


Download And Installing Android ADT Plugin For Eclipse

Previous tutorial  Android SDK tools show you how to install android SDK tools and the Eclips IDE . Now I'm going to complete the steps. First I will show you how to download and install Android ADT Plugin For Eclipse, then how to update the Android ADT Plugin For Eclipse , and finally how to create avd .

Installing the ADT Plugin for Eclipse

Android Development Tools (ADT)

When Eclipse is launched, select Help ->  Install New Software  to install the Android Development Tools (ADT) plug-in for Eclipse.
Installing the ADT Plugin for Eclipse
ADT Plugin for Eclipse   

In the Install dialog that appears, specify https://dl-ssl.google.com/android/eclipse/ and press Enter. After a while, you will see the Developer Tools' item appear in the middle of the window . Expand it to reveal its content: Android DDMS, Android Development Tools, Android Hierarchy Viewer, and Android Traceview. 
Check all of them and click Next twice.

Installing the ADT Plugin
You will be asked to review and accept the  licenses. Check the “I accept the terms of the  license agreements” option and click Finish. Once the installation is completed, you will be asked to  restart Eclipse. Go ahead and restart Eclipse now. 

Installing the ADT Plugin
When Eclipse is restarted, you are asked to configure your Android SDK. As the  Android SDK has already been downloaded earlier In the previous tutorial Android SDK tools , check the “Use existing  SDKs” option and specify the directory where you  have installed the Android SDK. Click Next. 
After this step, you are asked to send your usage statistics to Google. Once you have selected your  choice, click Finish.

For more details about installing the ADT Plugin, go to
And carefully follow developer.android.com/sdk/eclipse-adt.html
the instructions for downloading and installing the ADT Plugin. 
If you have any problems downloading the ADT, check out Google’s help at

Updating the ADT Plugin for Eclipse

In most cases, you can update your ADT plug-in simply as follows:
1.   Navigate to Help -> Check for Updates.
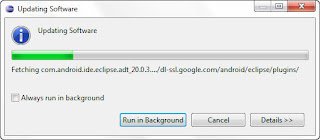
2.   If there are any ADT updates available, they will be presented. Simply select them and choose Install.
Sometimes a plug-in upgrade may be so significant that the dynamic update mechanism can’t be used. In those cases you may have to remove the previous plug-in  completely before installing the newer version.
Updating the ADT Plugin for Eclipse
Updating the ADT Plugin for Eclipse  

Updating the ADT Plugin for Eclipse
Updating the ADT Plugin for Eclipse  

Updating the ADT Plugin for Eclipse
Updating the ADT Plugin for Eclipse  

Updating the ADT Plugin for Eclipse
Updating the ADT Plugin for Eclipse  

Updating the ADT Plugin for Eclipse
Updating the ADT Plugin for Eclipse  

Updating the ADT Plugin for Eclipse
Updating the ADT Plugin for Eclipse  
      

Creating Android Virtual Devices (AVDs) for Use in the Android Emulator


Creating Android Virtual Devices (AVDs)

The Android emulator, included in the Android SDK, allows you to run Android apps in a simulated environment on your computer rather than on an actual Android device. Before running an app in the emulator, you must create an Android Virtual Device (AVD) which defines the characteristics of the device on which you want to test, including the screen size in pixels, the pixel density, the physical size of the screen, size of the SD card for data storage and more. If you want to test your apps for multiple Android devices, you can create separate AVDs that emulate each unique device. To do so, perform the following steps:
To create an AVD, From Eclipse select Window ->  AVD Manager to display the Android Virtual Device Manager window .

Creating Android Virtual Devices (AVDs)
Creating Android Virtual Devices (AVDs)  
 Click New… to display the Create new Android Virtual Device (AVD) window, then configure the optionsas shown and click Create AVD. 

Create new Android Virtual Device
Each AVD you create has many other options specified in its config.ini. You can modify this file as described at 
developer.android.com/guide/developing/devices/managing-avds.html
To more precisely match the hardware configuration of your device.
It is preferable to create a few AVDs with different API levels and hardware configurations so that your application can be tested on different versions of the Android OS. 
Once your ADV has been created, it is time to test it. Select the AVD that you want to test and click the Start… button. The Launch Options dialog will appear. If you have a small monitor, it is recommended that you check the “Scale display to real size” option so that you can set the emulator to a smaller size. Click the Launch button to start the emulator.

AVDs with different API levels
AVDs with different API levels 
Now all tools are ready and you will be able to learn how to write your first Android application!

Download & Installing Android SDK tools - Eclipse Tutorial


Android SDK tools and Eclipse Tutorial

In the previous tutorial we know To develop Android apps you need a Windows®, Linux or Mac OS X system  Android Developer Tools . Now I'm going to download and install Android SDK tools & eclipse tools that required for developing the first app with android.

Installing the Java Development Kit (JDK)

Android requires the Java Development Kit (JDK) version 5 or 6 (JDK 5 or JDK 6). We used JDK 6. To download the JDK for Linux or Windows, go to
You need only the JDK. Be sure to follow the installation instructions at
Recent versions of Mac OS X come with Java SE 6. Be sure to get the latest version by using the Apple menu feature to check for software updates.

Android SDK

Download android sdk

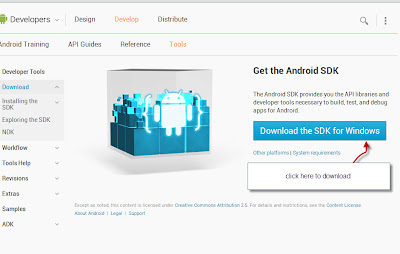
You can download the Android SDK tools from developer.android.com/sdk/index.html
Click the link for your platform. Windows, Mac OS X or Linux to download the SDK’s archive file. Once you’ve downloaded the archive, simply extract its contents to a directory of your choice on your computer. Google recommends that you download the  installer_r20.0.3-windows.exe http://dl.google.com/android/installer_r20.0.3-windows.exe file instead and use it to set up the tools for you automatically. The following steps walk you through the installation process using this approach.
Download android sdk
Download Android SDK

Installing the Android SDK Tools

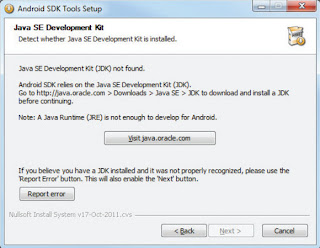
When you have downloaded the installer_r20.0.3-windows.exe file, double-click it to start the installation of the Android tools. In the welcome screen of the Setup Wizard, click Next to continue If your computer does not have Java installed, you will see the error dialog shown in the picture .
Installing the Android SDK Tools

  
Note : to avoid this error you must Installing the Java Development Kit (JDK) .
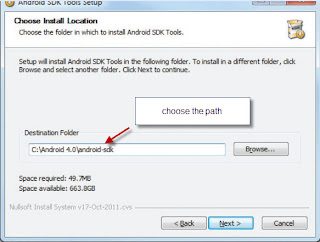
You will be asked to provide a destination folder to install the Android SDK tools. Enter a destination path  and click Next.

Installing the Android SDK Tools
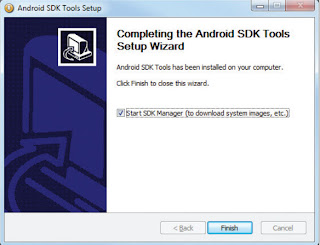
When the setup is done, check the “Start SDK Manager (to download system images, etc.)” option and click Finish. This will start the SDK Manager.
Note : to avoid any problem though installation runs the SDK Manger as administrator .

Installing the Android SDK Tools

Configuring the Android SDK Manager


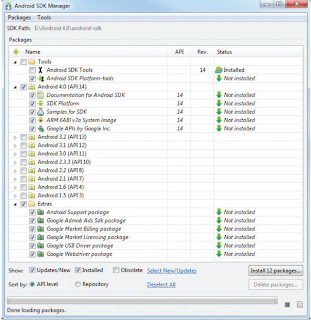
The Android SDK Manager manages the various versions of the Android SDK currently installed on your computer. When it is launched, you will see a list of items and whether or not they are currently installed on your computer. 
Android SDK Manager
Android SDK Manager

Check the relevant tools, documentation, and platforms you need for your project. Once you have selected the items you want, click the Install button to download them. Because it takes a while to download from Google’s server, it is a good idea to download only what you need immediately, and download the rest when you have more time.

NOTE  For a start, you should at least select the latest Android 4.0 SDK platform and the Extras. 

Each version of the Android OS is identified by an API level number. For example, Android 2.3.3 is level 10 (API 10), while Android 3.0 is level 11 (API 11), and so on. For each level, two platforms are available. For example, level 14 offers the following:
- SDK Platform
- Google APIs by Google Inc.

The key difference between the two is that the Google APIs platform contains additional APIs provided by Google (such as the Google Maps library). Therefore, if the application you are writing requires Google Maps, you need to create an AVD using the Google APIs platform .

You will be asked to choose the packages to install. Check the Accept All options and click Install.


Configuring the Android SDK Manager
The SDK Manager will proceed to download the packages that you have selected. The installation takes some time, so be patient. When all the packages are installed, you will be asked to restart the ADB (Android Debug Bridge). Click Yes.

Installing the Eclipse IDE 


Eclipse is the recommended integrated development environment (IDE) for Android development, though it’s possible to use other IDEs, text editors and command-line tools. To download the Eclipse IDE for Java Developers, go to www.eclipse.org/downloads/ .
This page will allow you to download the latest version of Eclipse and you will see the latest version. To use another version, click the Older Versions' link above the list of downloads. Select the appropriate version for your operating system (Windows, Mac or Linux). To install Eclipse, you simply extract the archive’s contents to your hard drive. 
On our Windows 7 system, we extracted the contents to C:\Eclipse. 

For more Eclipse installation information, see http://wiki.eclipse.org/FAQ_Where_do_I_get_and_install_Eclipse%3F
Note: when you download the example code from some site you need to configure Eclipse to use JDKX (x like 6 or 7) by performing the following steps:

1. Locate the Eclipse folder on your system and double click the Eclipse icon (eclipse.exe) to open Eclipse.
2. When the Workspace Launcher window appears, click OK.
3. Select Window > Preferences to display the Preferences window.
4. Expand the Java node and select the Compiler node. Under JDK Compliance, set Compiler compliance level to x.x(x.x like 1.6 or 1.7 etc ).
5. Close Eclipse.

 Continue to part 2 of tools that required for developing the first app with android .
Installing Android ADT Plugin For Eclipse